1. Help !
A key area we’ve been working on for a while is our new Groovy documentation. Peter Ledbrook has detailed how you can help us author some sections of the documentation. Read his post here.
Like Peter, you can dedicate a bit of your time on a topic of your choice, to further deepen your understanding of a particular area of Groovy and share your knowledge with your peers.
We really look forward to your contributions!
2. Contributions Walk-Thru
-
Working internet connection
-
Familiarity with computer directory organization, folders, sub-directories and structures of hierarchies
-
Have a GitHub Account and familiarity with concepts about code repositories - also called repo-s
-
Knowledge of computer terminal command line
-
Installed GIT tool
-
Plain text editor like TEXTEDIT, NOTEPAD, gedit, Leafpad; - a tool that does NOT include markup like bold,italics, etc. and saves file in the UTF-8 character set
-
Be familiar with Asciidoctor markup and the syntax reference guide ( more notes are listed below ).
-
Optionally - have the asciidoctor toolchain installed on your local system
-
Be familiar with unit testing of individual programs; it may be necessary to write some new test cases for groovy modules. ( Optional )
-
Enthusiasm and nice writing style
| It’s NOT necessary to have Groovy installed on your local system to be able to write documentation. |
2.1. Join Us !
Please join any of our mailing lists at http://groovy-lang.org/mailing-lists.html.
Whether you are a user, developer, or enthusiast, we have a choice of mailing lists you may find appealing. Ask and get answers for questions about the Groovy eco-system.
You can find live #groovylang feeds for up-to-the-minute news.
2.2. Where is Groovy ?
Open source developers often need somewhere to keep all their assets. These assets are typically stored in a repository somewhere on the internet. GitHub is one such storage facility. At Groovy, we keep our source code here.
2.3. How Do I Contribute ?
There are two paths to contribute :
For small things, you can change the relevant document on-line, within the GitHub system. For spelling or punctuation typos, broken language, etc, you can edit the document live from within Github. We mention this approach for small contributions that don’t require us to run the tests / create or update new tests. Follow this trail.
For larger contributions, it’s more likely you’ll need to copy Groovy into your own work environment, then Take The Long Way Home.
3. Quick Fixes To Groovy
Sometimes, you may spot a tiny flaw in our otherwise perfect product. It’s bugging you, so you want to fix it quickly without all the trouble of porting Groovy to your own system. Can it be done ?
Sure
Let’s say you need to fix the Groovy README.adoc file in https://github.com/apache/incubator-groovy - our core location.
| Only use this way to fix small stuff like spelling bits. Otherwise your fix may avoid our indepth testing process :-( |
Click the core location address to get here :

Your view should look like this, except it will say groovy / groovy-core ( this view was from another example and has the wrong location name ). Confirm you are viewing groovy / groovy-core then click the name of the resource to edit, in this case README.adoc. The following view opens.
This view is the current content of the README file. You can see ( but not edit ) the raw text by clicking the RAW button. But for this example, you want to change some text. The red arrow points to the editor PENCIL. Click that to open an editable version of this page. See below.
Confirm you’re on the correct page ( blue square ). Then on line 80, after the words Continuous Integration add the word Server
Then add more details like this :
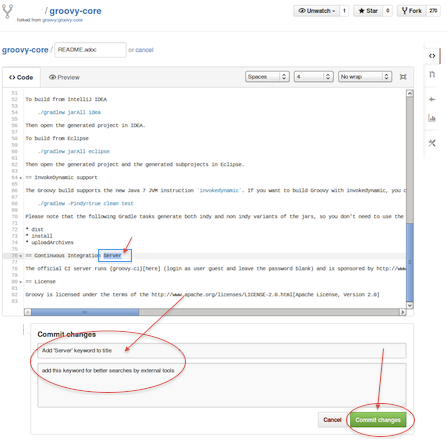
In the box marked Commit changes add a short descriptive title and add more detail below. Then click Commit changes button to seal the deal. Easy-peasy
4. Take The Long Way Home
This way needs more work on your part though it it is more rewarding too.
First we look at the home of Groovy . Then we review the structure and important items. After that we pick up the story at Getting Started.
4.1. Notes About GitHub
At Groovy, we keep our source code here.
4.1.1. GitHub Information
Typical Workflow Steps
- join GitHub
- sign in to your GitHub account
- locate the groovy code base
- make a copy ( FORK ) of it into your own online GitHub account
- make a local copy ( CLONE ) from your own online GitHub account
- create a new feature branch
- switch to your new feature branch
- build/amend the documents
- provide screen images if needed
- provide test cases to match your documentation
- build and test everything
- commit your changes
- switch to your master branch
- merge your branch full of changes into the master branch
- send ( PUSH ) your changes back to your own online account
- ask the groovy admins to include ( PULL ) your changes in the groovy code base
Git Clients
Git References
4.2. Groovy Directory Structure
From here on, we’ve assumed you have logged into your own GitHub account.
4.2.1. Visit Groovy Core Repository on GitHub
Open a web browser, then use address https://github.com/apache/incubator-groovy to review the Groovy code base. It looks like this :
There are a number of folders within the Groovy code base. The most important folders are /src and /subprojects as these folders hold the base code and scripts for Groovy.
4.2.2. The /src Folder
The core of Groovy lives within this folder. Here is where we find a variety of artifacts, scripts, tests, resources, images, etc.
4.2.3. The /subprojects Folder
Groovy has many additional features that are not part of the core system. Source code for these added features can be found in the subprojects folder. It looks something like this :
4.2.4. The Documentation Folder
Within each /src and /subproject/src is a /spec documents folder that exists, or will soon be created.
The two most useful folders here are /doc and /test. These two folders hold our documents and test cases.
Documents
All of our documents are written as typical text files encoded as UTF-8 characters. The text is styled in the markup syntax known as asciidoc or asciidoctor ( the more recent version ). These text files have a filename suffix designation of .adoc.
Test Cases
To prove that Groovy modules work as expected, we often construct test cases that exercise code logic. These test cases are actually Groovy scripts that reside in the /test folder.
If you would like to know more about writing effective test cases, please review this link.
5. Getting Started
Let’s assume you’ve logged into your GitHub account.
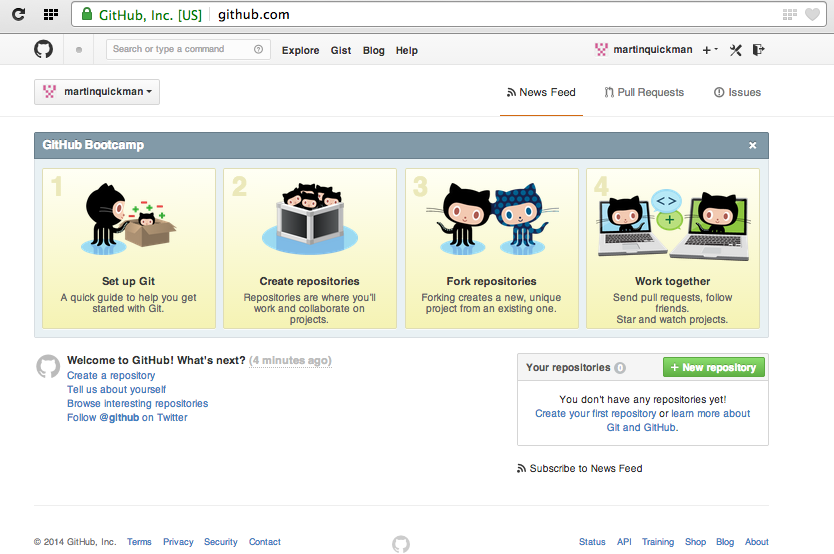
This is the typical panel you use to work with GitHub. It has a variety of things you can do. You’ll need to search for the Groovy repository, so look at the top of this panel. See that field named Search or type a command ? Let’s use that to .
5.1. Make Groovy Your Own

Ok, let’s look for the groovy-core repository. In the field named Search or type a command enter groovy-core then click Search. You should see a repository named groovy/groovy-core so click that to visit the home of Groovy.
So you can work on your own version of Groovy, you’ll need to make a copy of it. This copy is placed in your own GitHub account under your credentials. This task of making a copy is known as Fork -ing.
Check you’re logged into your own GitHub account before you start to search.
Fork the groovy/groovy-core repository on GitHub to your own GitHub account. Click the Fork button while on the groovy/groovy-core panel. When you look at your own GitHub home page, you’ll see the list of your forked repos and any new repos you make.
You now have your own version of Groovy in your GitHub account on the remote server. Next, you’ll want to bring a copy of it onto your local system. It’s easier to work with documents and test cases that way.
| See this gun.io tutorial covering fork, branch, pull tactics. |
5.2. Terminally Yours
Open a terminal/command prompt
Make a folder to hold your copy of Groovy; for now, create a folder named groovy-core
Change directories ( cd ) into your groovy-core version of the directory.
5.3. Copy Groovy
Clone/copy your forked repository from your own GitHub account to your local system, then check which version of the Java runtime environment you have.
git clone https://github.com/xxxxxx/groovy-core.git
cd groovy-core
java -version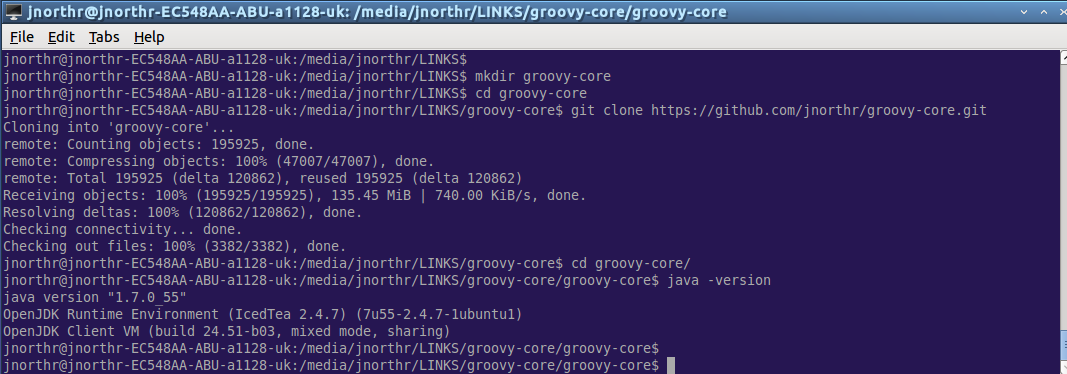
If your java version is earlier than 1.6 you might not be able to do much testing. If it’s recent then change directories into the groovy-core folder.
5.4. Check Your Installation
To make sure you can build and test your Groovy version, try to build just the Groovy document suite.
-
bash ./gradlew asciidocAll on Linux/Ubuntu
-
gradlew asciidocAll on Windows
-
./gradlew asciidocAll for Apple
Your sample log might look like this :
Sample Log
martin@martin-EC548AA-ABU-a1128-uk:/media/martin/LINKS/groovy-core/groovy-core$ bash ./gradlew asciidocAll
To honour the JVM settings for this build a new JVM will be forked. Please consider using the daemon: http://gradle.org/docs/1.12/userguide/gradle_daemon.html.
:buildSrc:clean UP-TO-DATE
:buildSrc:compileJava
:buildSrc:compileGroovy
:buildSrc:processResources UP-TO-DATE
:buildSrc:classes
:buildSrc:jar
:buildSrc:assemble
:buildSrc:compileTestJava UP-TO-DATE
:buildSrc:compileTestGroovy UP-TO-DATE
:buildSrc:processTestResources UP-TO-DATE
:buildSrc:testClasses UP-TO-DATE
:buildSrc:test UP-TO-DATE
:buildSrc:check UP-TO-DATE
:buildSrc:build
Using Java from /usr/lib/jvm/java-7-openjdk-i386/jre (version 1.7.0_55)
Detected development environment
:asciidoctor
Rendering /media/martin/LINKS/groovy-core/groovy-core/src/spec/doc/core-closures.adoc
Rendering /media/martin/LINKS/groovy-core/groovy-core/src/spec/doc/core-differences-java.adoc
Rendering /media/martin/LINKS/groovy-core/groovy-core/src/spec/doc/core-domain-specific-languages.adoc
Rendering /media/martin/LINKS/groovy-core/groovy-core/src/spec/doc/core-gdk.adoc
Rendering /media/martin/LINKS/groovy-core/groovy-core/src/spec/doc/core-getting-started.adoc
Rendering /media/martin/LINKS/groovy-core/groovy-core/src/spec/doc/core-introduction.adoc
Rendering /media/martin/LINKS/groovy-core/groovy-core/src/spec/doc/core-metaprogramming.adoc
Rendering /media/martin/LINKS/groovy-core/groovy-core/src/spec/doc/core-object-orientation.adoc
Rendering /media/martin/LINKS/groovy-core/groovy-core/src/spec/doc/core-operators.adoc
asciidoctor: WARNING: src/spec/doc/design-pattern-abstract-factory.adoc: line 1: section title out of sequence: expected level 2, got level 4
asciidoctor: WARNING: design-pattern-in-groovy.adoc: line 52: section title out of sequence: expected level 2, got level 3
Rendering /media/martin/LINKS/groovy-core/groovy-core/src/spec/doc/design-pattern-iterator.adoc
Rendering /media/martin/LINKS/groovy-core/groovy-core/src/spec/doc/design-pattern-loan-my-resource.adoc
Rendering /media/martin/LINKS/groovy-core/groovy-core/src/spec/doc/design-pattern-null-object.adoc
Rendering /media/martin/LINKS/groovy-core/groovy-core/src/spec/doc/design-pattern-pimp-my-library.adoc
Rendering /media/martin/LINKS/groovy-core/groovy-core/src/spec/doc/design-pattern-proxy.adoc
Rendering /media/martin/LINKS/groovy-core/groovy-core/src/spec/doc/design-pattern-singleton.adoc
Rendering /media/martin/LINKS/groovy-core/groovy-core/src/spec/doc/design-pattern-state.adoc
Rendering /media/martin/LINKS/groovy-core/groovy-core/src/spec/doc/design-pattern-strategy.adoc
Rendering /media/martin/LINKS/groovy-core/groovy-core/src/spec/doc/design-pattern-template-method.adoc
Rendering /media/martin/LINKS/groovy-core/groovy-core/src/spec/doc/design-pattern-visitor.adoc
Rendering /media/martin/LINKS/groovy-core/groovy-core/src/spec/doc/grape.adoc
asciidoctor: WARNING: grape.adoc: line 28: section title out of sequence: expected levels 0 or 1, got level 2
asciidoctor: WARNING: grape.adoc: line 105: section title out of sequence: expected levels 0 or 1, got level 2
Rendering /media/martin/LINKS/groovy-core/groovy-core/src/spec/doc/guide-integrating.adoc
asciidoctor: WARNING: guide-integrating.adoc: line 11: section title out of sequence: expected levels 0 or 1, got level 2
Rendering /media/martin/LINKS/groovy-core/groovy-core/src/spec/doc/index.adoc
Rendering /media/martin/LINKS/groovy-core/groovy-core/src/spec/doc/invokedynamic-support.adoc
Rendering /media/martin/LINKS/groovy-core/groovy-core/src/spec/doc/license-contributors.adoc
Rendering /media/martin/LINKS/groovy-core/groovy-core/src/spec/doc/template-engines.adoc
asciidoctor: WARNING: subprojects/groovy-templates/src/spec/doc/markup-template-engine.adoc: line 1: section title out of sequence: expected level 2, got level 3
asciidoctor: WARNING: template-engines.adoc: line 145: section title out of sequence: expected level 2, got level 3
Rendering /media/martin/LINKS/groovy-core/groovy-core/src/spec/doc/tools-groovyc.adoc
Rendering /media/martin/LINKS/groovy-core/groovy-core/src/spec/doc/tools-groovyconsole.adoc
Rendering /media/martin/LINKS/groovy-core/groovy-core/src/spec/doc/tools-groovydoc.adoc
Rendering /media/martin/LINKS/groovy-core/groovy-core/src/spec/doc/tools-groovysh.adoc
Rendering /media/martin/LINKS/groovy-core/groovy-core/src/spec/doc/tools-ide.adoc
Rendering /media/martin/LINKS/groovy-core/groovy-core/src/spec/doc/version-scheme.adoc
Rendering /media/martin/LINKS/groovy-core/groovy-core/src/spec/doc/windows-nsis-installer.adoc
:asciidoctorAssets
:asciidocAll
:groovy-ant:asciidoctor SKIPPED
:groovy-ant:asciidoctorAssets
:groovy-ant:asciidocAll UP-TO-DATE
:groovy-bsf:asciidoctor
Rendering /media/martin/LINKS/groovy-core/groovy-core/subprojects/groovy-bsf/src/spec/doc/integrating-bsf.adoc
:groovy-bsf:asciidoctorAssets
:groovy-bsf:asciidocAll
:groovy-console:asciidoctor SKIPPED
:groovy-console:asciidoctorAssets
:groovy-console:asciidocAll UP-TO-DATE
:groovy-docgenerator:asciidoctor SKIPPED
:groovy-docgenerator:asciidoctorAssets
:groovy-docgenerator:asciidocAll UP-TO-DATE
:groovy-groovydoc:asciidoctor SKIPPED
:groovy-groovydoc:asciidoctorAssets
:groovy-groovydoc:asciidocAll UP-TO-DATE
:groovy-groovysh:asciidoctor SKIPPED
:groovy-groovysh:asciidoctorAssets
:groovy-groovysh:asciidocAll UP-TO-DATE
:groovy-jmx:asciidoctor
Rendering /media/martin/LINKS/groovy-core/groovy-core/subprojects/groovy-jmx/src/spec/doc/jmx.adoc
:groovy-jmx:asciidoctorAssets
:groovy-jmx:asciidocAll
:groovy-json:asciidoctor
Rendering /media/martin/LINKS/groovy-core/groovy-core/subprojects/groovy-json/src/spec/doc/json-userguide.adoc
:groovy-json:asciidoctorAssets
:groovy-json:asciidocAll
:groovy-jsr223:asciidoctor
Rendering /media/martin/LINKS/groovy-core/groovy-core/subprojects/groovy-jsr223/src/spec/doc/integrating-jsr223.adoc
:groovy-jsr223:asciidoctorAssets
:groovy-jsr223:asciidocAll
:groovy-nio:asciidoctor SKIPPED
:groovy-nio:asciidoctorAssets
:groovy-nio:asciidocAll UP-TO-DATE
:groovy-servlet:asciidoctor SKIPPED
:groovy-servlet:asciidoctorAssets
:groovy-servlet:asciidocAll UP-TO-DATE
:groovy-sql:asciidoctor SKIPPED
:groovy-sql:asciidoctorAssets
:groovy-sql:asciidocAll UP-TO-DATE
:groovy-swing:asciidoctor SKIPPED
:groovy-swing:asciidoctorAssets
:groovy-swing:asciidocAll UP-TO-DATE
:groovy-templates:asciidoctor
Rendering /media/martin/LINKS/groovy-core/groovy-core/subprojects/groovy-templates/src/spec/doc/markup-template-engine.adoc
:groovy-templates:asciidoctorAssets
:groovy-templates:asciidocAll
:groovy-test:asciidoctor SKIPPED
:groovy-test:asciidoctorAssets
:groovy-test:asciidocAll UP-TO-DATE
:groovy-testng:asciidoctor SKIPPED
:groovy-testng:asciidoctorAssets
:groovy-testng:asciidocAll UP-TO-DATE
:groovy-xml:asciidoctor SKIPPED
:groovy-xml:asciidoctorAssets
:groovy-xml:asciidocAll UP-TO-DATE

BUILD SUCCESSFUL

Total time: 5 mins 22.43 secs
5.5. Success ?
If your command log looks something like the above, then you have a valid Groovy installation, and you’ve also constructed a fresh local copy of the Groovy documentation.
You can check your local copy to see if it looks good. Using the example above, you should have an index.html page located in file:///media/martin/LINKS/groovy-core/target/asciidoc/index.html though your actual address of the index.html file will differ a little. Enter your own address as a browser address, then you should see this :
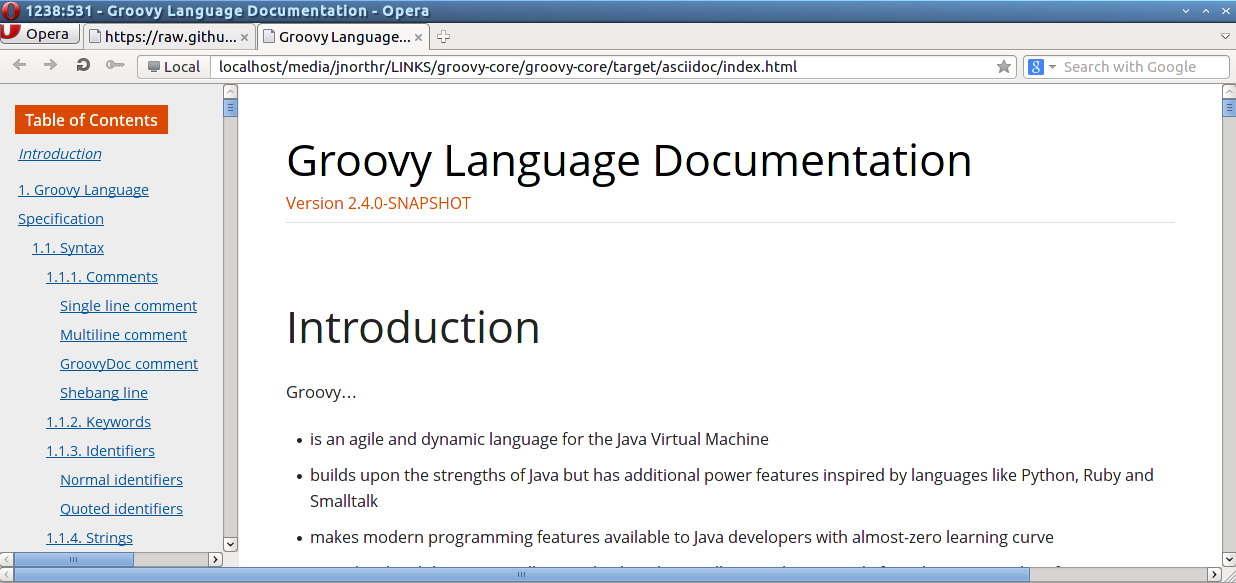
As you update documents, you may need to see how it looks. Following the previous steps, you can do it using the ./gradlew asciidocAll command, then open the Groovy Index page and navigate to the topic you’ve updated.
6. Choose Where To Contribute
6.1. Identify Potential Topics
Do you have a special interest, or know some areas where you have some knowledge or where your skills may be useful ? There are many areas where your expertise can be put to good use. Here’s one idea.
Open the Groovy Documentation Tree. There are a large number of document files, one for each core component and each separate sub-project extension within Groovy. These are simple text file (no funny stuff) in a markup syntax called asciidoc. Document files end with .adoc.
| This link is for documents in the core system. There are matching trees for each sub-project like json, xml, swing, etc. |
For an example, let’s look at one document named core-domain-specific-languages.adoc. Confirm you are signed into GitHub then click the above link to see our live documentation tree.
You’ll be taken into the document set for domain specific languages in the live Groovy code base - not your own GitHub version.
| Remember that Groovy development is dynamic and changes daily. The copy you took will become dated and will not have newer changes, additions, etc. so it’s more accurate to review live Groovy when deciding what you’d like to do. |
6.2. Drill Down
See that module named core-domain-specific-languages.adoc ? Click on that filename.
If you review core-domain-specific-languages.adoc, you’ll see a button marked Raw at the top right. Click Raw to see the actual plain text markup within the core-domain-specific-languages.adoc file. It starts like this:
 = Domain-Specific Languages

 == Command chains

Groovy lets you omit parentheses around the arguments of a
method call for top-level statements. ``command chain'' feature extends this by allowing us to chain such
parentheses-free method calls, requiring neither parentheses around arguments, nor dots between the chained calls.
The general idea is that a call like `a b c d` will actually be equivalent to `a(b).c(d)`. This
also works with multiple arguments, closure arguments, and even named arguments. Furthermore, such command chains can
also appear on the right-hand side of assignments. Let's have a look at some examples
supported by this new syntax:

[source,groovy]
---------------------------------------------------------------------------------------------------------------
// equivalent to: turn(left).then(right)
turn left then right
. .
...
Then if you look below, you can see different topics like :
 == Operator overloading

(TBD)

 == Script base classes

(TBD)

 == Adding properties to numbers

(TBD)
Since these titles are marked as (TBD) or To Be Done they need some work.
6.3. Ready To Start ?
So now you know how and where to look, you can review our Groovy documents depending on your area of interest. Find a subject title marked something like +== Operator overloading
(TBD) + in one of our .adoc files, or whatever takes your fancy.
Then after you decide how/where to donate, register your interest in that area and claim it as yours. Read on to learn how you do that.
7. Stand And Declare
7.1. Declare Your Interest
To let us know you’re working on a topic, it’s useful to put your id, like nickname, date, etc., next to your topic. Edit the .adoc file directly in your own online copy of groovy-core to insert your id. After that, save the document, comment and commit the change. Finally, you issue a PULL request to the Groovy admins to merge your amendment back into the Groovy code base from your GitHub account.
This way you stake a claim to a particular topic and everyone knows it’s what you’re working on. If someone else wants to work on that topic, they’ll see your id and should avoid it.
| After you are finished writing, editing, updating and placing your changes back into the Groovy code base, you will need to remove your id. |
7.1.1. Annotate The Topic Document
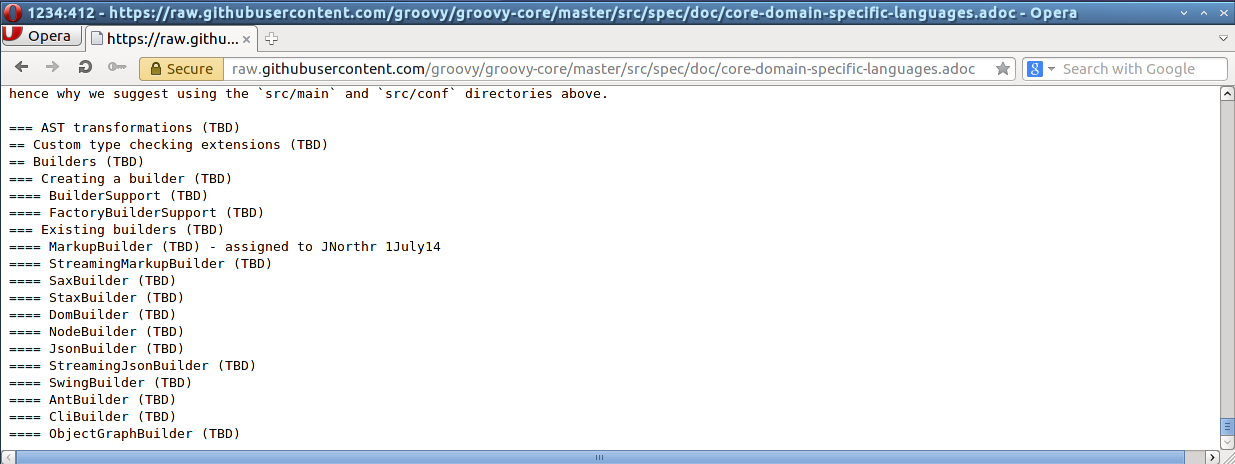
Here’s a demo we did earlier. Notice the line +==== MarkupBuilder
(TBD) - assigned to JNorthr 1July14+ assigned to one of our documentation team ?
You need to do the same, to an .adoc document in your own GitHub copy. Look in a folder named something like ./groovy-core/groovy-core/src/spec/doc to see where your topic has been discussed. Then edit it, adding your id and, if necessary, save as plain text format using the UTF-8 character set.
| We do not have a procedure yet for new topics. Can you suggest one ? |
If you’ve cloned/copied groovy-core to your local system, you can do the same thing this way :
cd ./groovy-core/groovy-core/src/spec/doc
edit core-domain-specific-languages.adoc
// add your id on the topic you'll document
save core-domain-specific-languages.adoc as UTF-87.2. Fix GitHub
Now your id is back in your own GitHub repo, you can send your change(s) back to Groovy. You must ask Groovy admin to merge your changes into Groovy from your own GitHub account. Go to your own GitHub home page and find the repository you copied from Groovy.

A merge is known as a PULL request because you are asking Groovy admin to PULL your changes back into the Groovy codebase.
Click the PULL button to see the next panel.
| Only one PULL request can be issued for each branch modification. |
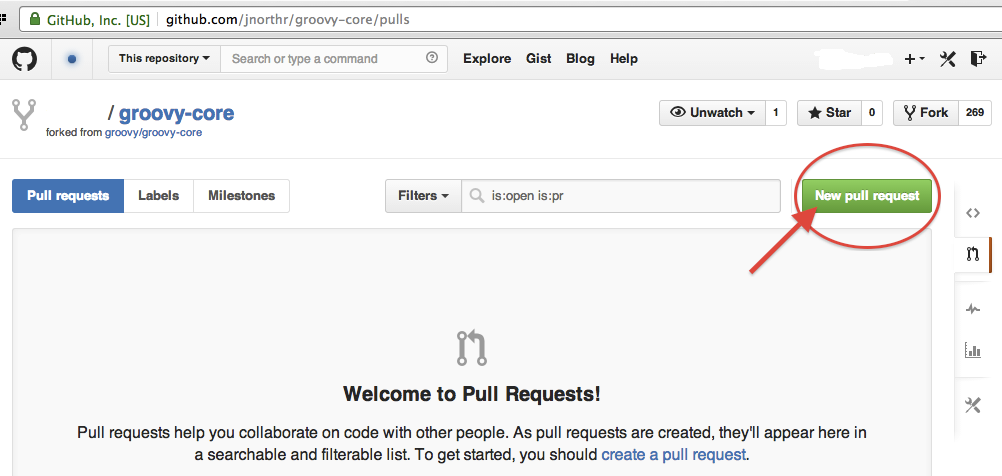
Click the New Pull Request button.
You will need to enter a comment and title. It helps Groovy admin to understand what’s going on.
7.3. Review Your Submission
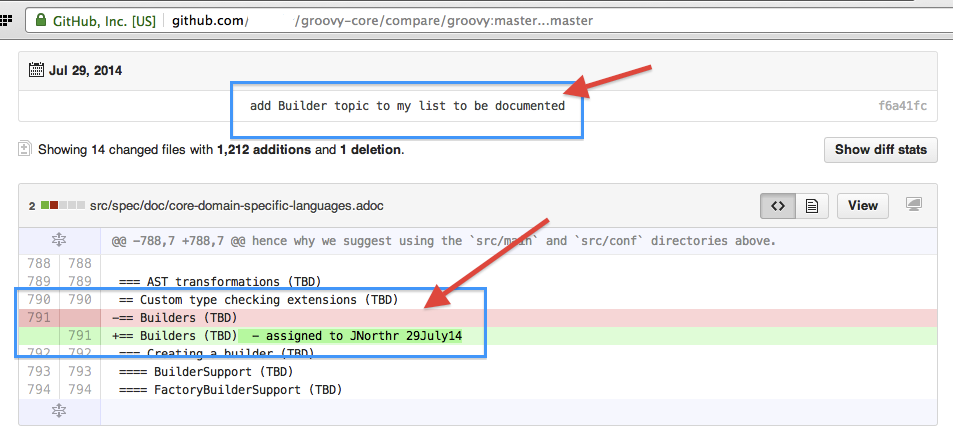
You can review your submitted details here. See where your commit statement appears ? Under that, you can see your actual changes, the line in PINK was removed and replaced by the line shown in GREEN. ( This sample is from a more recent declaration ).
8. Asciidoctor Markup, A Review
This Groovy document, and most others, are written with asciidoctor. Each time Groovy is rebuilt, a fresh version of all .adoc files are too. Visit our Success topic above to learn how to review your own Groovy documents.
Here’s an overview of the Asciidoctor Syntax. It’s a simple markup style that comes with a Ruby Gem. The markup syantax is based on an earlier effort named asciidoc and you can read more about that original version of Asciidoc here. Review a style guide here.
8.1. Why Use Asciidoctor ?
IN these days of fast paced application development, it’s GR8 to have a simple markup language and tool to write stuff. The asciidoctor tool is a quick performing ruby gem we can use to write up documentation and reference materials. We can write them quickly, then translate them into either HTML or Docbook output, and we can do this outside the Groovy development environment. Of course, it’s an automatic feature of full Groovy build, but on a small scale, it’s much easier to see how things look when built locally before the full-build stage.
8.2. Install Your Own Doctor
If you still wish to donate some expertise, but want to avoid a full Groovy install, it’s possible to install the asciidoctor tool on your own system.
In a terminal console, try gem install asciidoctor using the asciidoctor toolchain guide here.
Then you can write a simple sample plain text file using an editor ( without funny stuff or markup). Follow the syntax guide above. Then when you’re ready, you can do this from a command line like we did here to create this document. This text file is named groovy-contributions.adoc and and it was saved with a UTF-8 character encoding.
After asciidoctor ran, we had an output file named groovy-contributions.html in the same directory as the .adoc file. Since the
CSS stylesheet is embedded in the .html document, you can view this result right away, though images and javascript stuff may not be in the expected place.
martin@EC548A:~/Desktop$ asciidoctor groovy-contributions.adoc
If you find you’ve created something useful, check out our mailing lists to see how you can donate it.
| Converting asciidoctor markup to html - will give Groovy people an overview of other possibilities. |
9. Tag Annotations
Documents benefit from the inclusion of code samples. Live tests that are part of a typical Groovy build are ideal candidates. We know that if a build succeeds, then all it’s tests were successful too. Therefore samples from live tests can improve our documents.
Before we get into the topic of test cases, here’s a heads-up on how we do it using some asciidoctor features.
9.1. Asciidoctor Includes and Tags
Asciidoctor can identify parts of files for inclusion. Use the include statement to insert source material from another file. The include syntax offers a nice way to choose a piece of the file to include. The tag declaration identifies the piece.
| tag names follow a convention of {name of script}_{name of method}_{incrementing number of this test within all tests}[] |
Given an asciidoctor declaration like this :
 === Sample Asciidoc BuilderSupportTest Tag

 [source,groovy]
 .BuilderSupportTest.groovy Listing
 ----
 include::BuilderSupportTest.groovy[tags=BuilderSupportTest_add_node_with_value_object4]
 ----
would only insert source statements between the BuilderSupportTest_add_node_with_value_object4 tag start and end as follows :
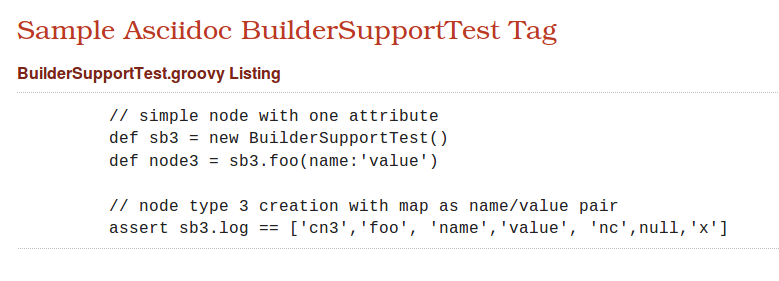
from this :
// tag::BuilderSupportTest_add_node_with_value_object4[]
        // simple node with one attribute
        def sb3 = new BuilderSupportTest()
        def node3 = sb3.foo(name:'value')

        // node type 3 creation with map as name/value pair
        assert sb3.log == ['cn3','foo', 'name','value', 'nc',null,'x']
// end::BuilderSupportTest_add_node_with_value_object4[]
| // characters identify the remainder of a line as remarks. |
Asciidoctor tags are simply remarks / comments and so are invisible at build time. They’re declared in pairs as a tag set. The tag keyword preceeds the tag name BuilderSupportTest_add_node_with_value_object4 followed by the asciidoc required tag ending of []
// tag:: says start using text after this line.
// end:: says stop using text before this line.
Does this make sense ? It’s possible to grab some of a live test and insert it into our document. It’s always a valid example 'cos the build succeeded
Ok, let’s review test cases next.
10. Examine Test Cases
10.1. Review Current Tests
Review the Test Case folder. There may already be tests that cover your area of interest. Some were written before tag standards came into existence. It might be as simple as adding asciidoctor tags around a test method.
10.1.1. Change Known Test Cases
Here’s an existing test case from groovy-core/src/spec/test/builder/CliBuilderTest.groovy :
Typical class comments preceed the class declaration with author attribution :
/**
* Tests for CliBuilder. The tests directly in this file are specific
* to CliBuilder. Functionality in common with other Builders
* is tested in the parent class.
*
* @author Groovy Documentation Community
*/
Earlier test cases did not use GroovyTestCase as a basis, though more recent test cases do :
class CliBuilderTest extends GroovyTestCase { void testObjectNotDefined() {
// tag::clibuilder_nullobject1[]
	CliBuilder clibuilder;

	// clibuilder should be null when not initialized
	assert clibuilder == null;
// end::clibuilder_nullobject1[]
} // end of method CliBuilder clibuilder;
// clibuilder should be null when not initialized
assert clibuilder == null;| The assert statement should have a remark before it. It should explain say why the test should succeed - not why it would fail |
10.2. Add New Test Cases
It’s outside the scope of this document, though if you feel something is missing in our test coverage, please raise a question. Our mailing lists are an ideal place to ask questions and receive suggestions about how you can contribute new test cases. Everyone says more tests improve product quality. Can you think of any tests we missed ?
10.2.1. Copyright Notice
It’s always useful to identify the license terms for use with any asset you create or amend. A copyright statement does just that. Here’s a sample copyright often used when doing test cases :
/*
 *  Licensed to the Apache Software Foundation (ASF) under one
 *  or more contributor license agreements.  See the NOTICE file
 *  distributed with this work for additional information
 *  regarding copyright ownership.  The ASF licenses this file
 *  to you under the Apache License, Version 2.0 (the
 *  "License"); you may not use this file except in compliance
 *  with the License.  You may obtain a copy of the License at
 *
 *    http://www.apache.org/licenses/LICENSE-2.0
 *
 *  Unless required by applicable law or agreed to in writing,
 *  software distributed under the License is distributed on an
 *  "AS IS" BASIS, WITHOUT WARRANTIES OR CONDITIONS OF ANY
 *  KIND, either express or implied.  See the License for the
 *  specific language governing permissions and limitations
 *  under the License.
*/11. How To Write Documentation
Review current Groovy documents to gain an understanding of how it’s written and what sort of content it has. Look at this page about Json. It uses our latest document standards. Now you know about tags you can appreciate how test samples are picked from external sources.
11.1. Our Suggestions
An introduction describes the purpose of the document. Major topical areas are started by level one headings. More detailed text pieces would be started with level two headings.
Follow guidelines for version 1.4.0 of Asciidoctor.
11.2. Refer To Testcase Tags
As per our notes above about tags, write your document to include external text when appropriate.
 [source,groovy]
 .Test.groovy Listing
 ----
 include::Test.groovy[tags=Test_add_new_json_node_with_value_7]
 ----
11.3. Images Go Where ?
Images of GUI panels improve understanding and act as a powerful aid to learn new and/or difficult concepts.
Groovy-core images and GUI related stuff can be put in the groovy-core/src/spec/assets/img folder. Sub-projects have their own image folders, so groovy-core/subprojects/groovy-servlet/src/spec/assets/img could keep images if a document concerns servlets.
| Some assets/img folders do not exist and must be created. |
Please try to keep the size of images small rather than use a very large image then ask asciidoctor to re-scale it smaller. This improves page load times for end users.
12. Review Output
After making changes, adding new features, images, external links, etc., it’s useful to review how it all looks on your own local system. If things don’t work out, it’s easier to fix than after promotion.
12.1. Regen Groovy Docs
First, change directories to the groovy-core directory created in Copy Groovy step.
~/.gradle $ cd /media/martin/LINKS/groovyCore/groovy-core
/media/martin/LINKS/groovyCore/groovy-core $ ./gradlew asciidocAll
To honour the JVM settings for this build a new JVM will be forked. Please consider using the daemon: http://gradle.org/docs/1.12/userguide/gradle_daemon.html.
:buildSrc:compileJava UP-TO-DATE
:buildSrc:compileGroovy UP-TO-DATE
:buildSrc:processResources UP-TO-DATE
:buildSrc:classes UP-TO-DATE
:buildSrc:jar UP-TO-DATE
:asciidoctor
Rendering /media/martin/LINKS/groovyCore/groovy-core/src/spec/doc/core-closures.adoc
To rebuild your version of Groovy documents, try this. Run one of these commands depending on your operating system:
-
bash ./gradlew asciidocAll on Linux/Ubuntu
-
gradlew asciidocAll on Windows
-
./gradlew asciidocAll for Apple
12.2. Review Generated Results
If your command worked ok, you’ll have a fresh local copy of the Groovy documentation.
You can check your local copy to see if it looks good. After a regen, there should be index.html page located in ./groovy-core/groovy-core/target/asciidoc/index.html ( your actual address may differ ).
Enter your own address in a browser to see this :

As you modify documents, you can now see how they look. Just navigate to the topic you’ve updated and enjoy the fruits of your efforts
13. Cleanup
Ok, we have everything in place. All our changes are good-to-go so now they can go back to groovy-core
13.5. Remove Your Interest Id
Follow the directions given in Stand And Declare to remove your id marker.
13.6. Your Merge Request
13.6.1. Groovy PULL Requests
In a browser, enter https://github.com/apache/incubator-groovy to see the groovy-core home page in GitHub. It’s where we can get to the feature to ask our changes to be merged.
Take a look here. See Pull Request 24 ? This is where you can see how many other PULL requests are open, waiting to be done. Clicking Pull Requests gives you the next view. The New pull request button is there
13.6.2. PULL The Other One
These are the current PULL requests for Groovy. Notice how each request has a title ? It’s important to provide some idea about what a request will do.
As this example is about adding new documentation, click the New pull request button.
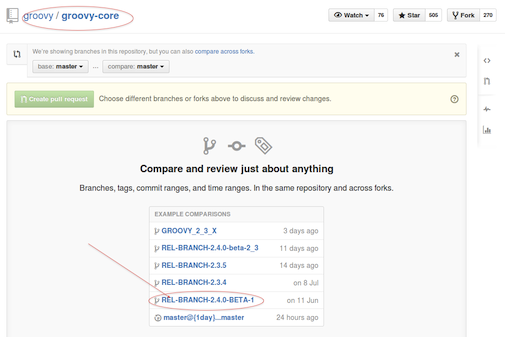
Pick a release to donate to. Typically, this would be the master branch, though if your work is for a future release, you could pick a more relevant branch.
Click the branch title where your request should go.
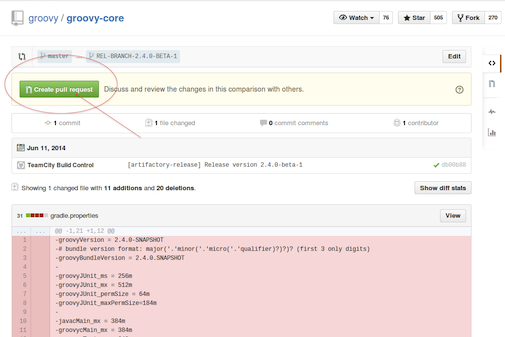
For this example, we’ll donate our work to release 2.4.0-beta-1. From this view, we can also see what’s going into, or will be removed from this release. See the Create pull request button ? Click that.
13.6.3. Do The Deed
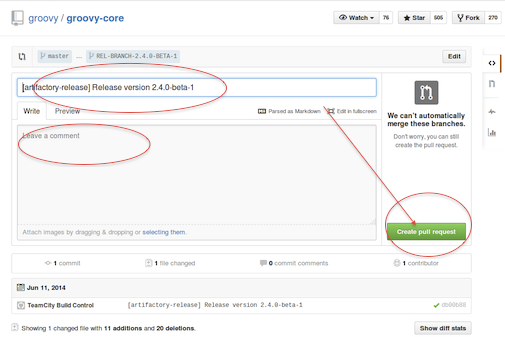
The Groovy admins use info from this view. Include a title for your request. Put some comments in too to start the thread of conversation about this donation. Click Create Pull request. You should receive a pull request number and the Pull Request 24 count from the home page will become 25 when your request is confirmed.
14. A Waiting Game
Now, you’ve submitted your request to Groovy admins and received a PULL / merge request number.
14.1. Track Your Changes
Again, do the same thing we did to create the request.
To follow the progress of your request, in a browser, enter https://github.com/apache/incubator-groovy to see the groovy-core home page in GitHub.
Look again. This is where you can saw how many other PULL requests were open, waiting to be done, including yours. Clicking Pull Request took you to the next page for that view.
14.1.1. The PULL List
Here are waiting PULL requests for Groovy. As this example is about adding new Builder Documentation, it was given a request number 488. Look down the page to find it.
To learn more about any request, click a request title. GitHub opens a request details view as seen below.
Everything about a request is shown there. It’s the data Groovy admins work with.
Queries might be raised about something in your submission. These comments may require further improvements and/or changes to your submission. It’s a bit like a message thread where interested people can follow progress of a submission, make suggestions, etc.
| Green marks confirm the success of a request. Click the icon to see how the request was processed. |
At the right of each entry are comment icons with the number of comments made about each request. Click the icon to get the following view.
14.2. Verify Success
| This step is optional |
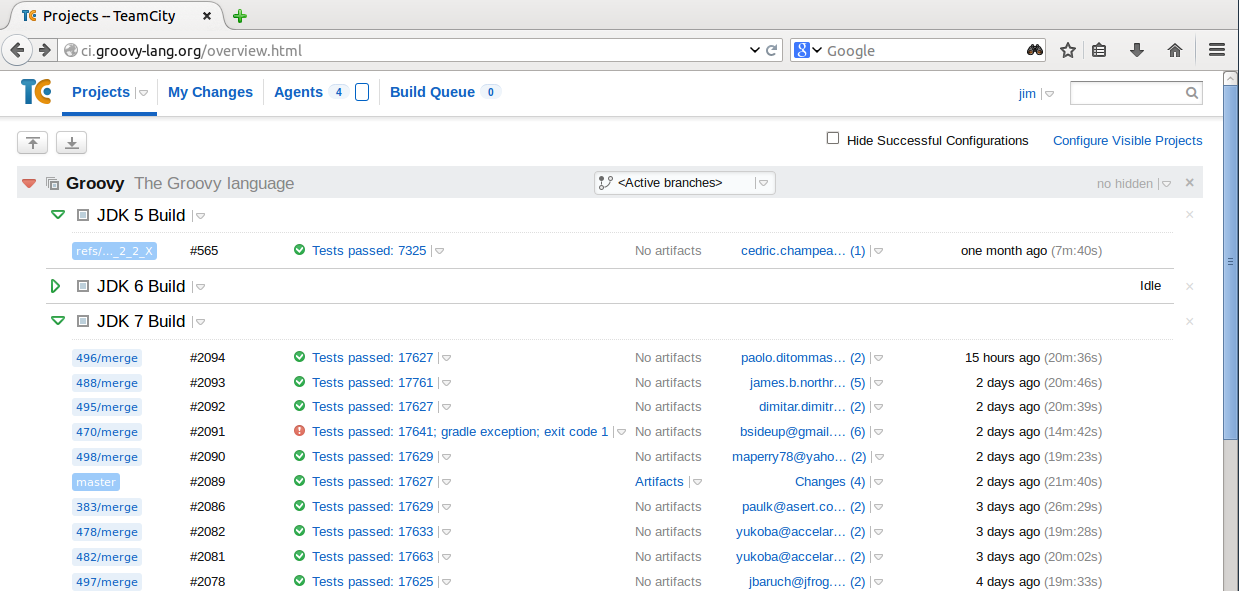
PULL requests become merge requests upon acceptance. Each merge is given a task number, for this example our merge / PULL request 488 is assigned task number 2093. It was merged into the master core branch of Groovy. Click 488/merge to drill down into the details.
The next view has specific details about every build attempt made for this request..
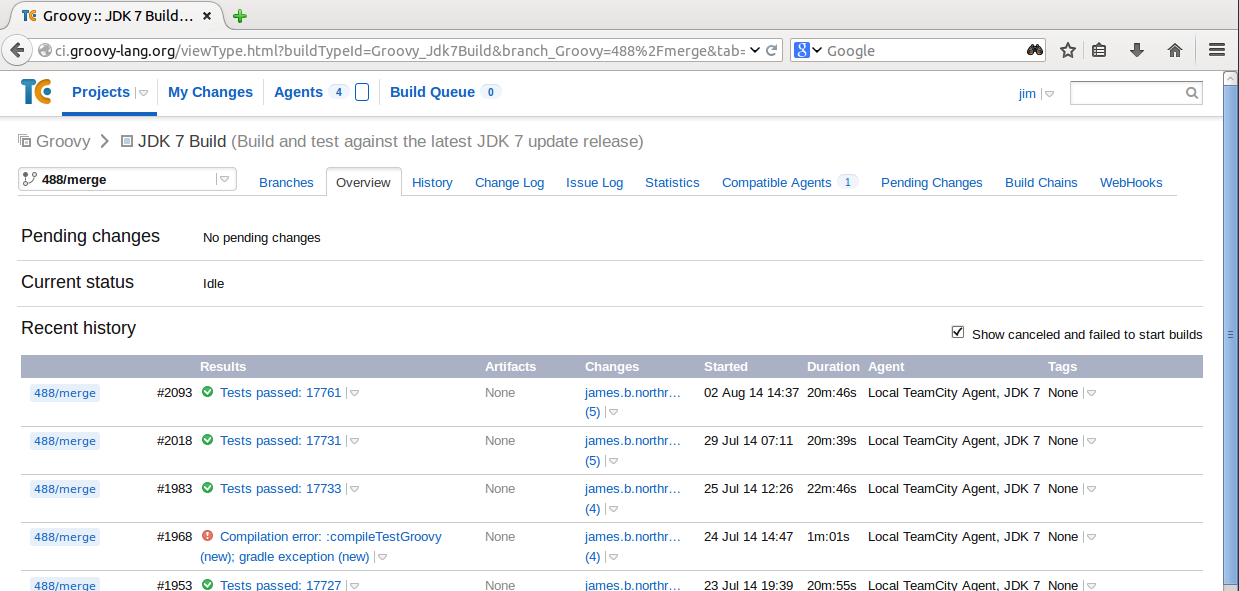
Here we can see that our request 488 has been executed a number of times. Each time it received another task execution number. The most recent task was 2093 marked with Green mark. That means Success !
| Task 1968 failed as there is a red |
For even more detail, we can drill down again into task messages by clicking the request number. Click task Tests passed 17761 for next view.
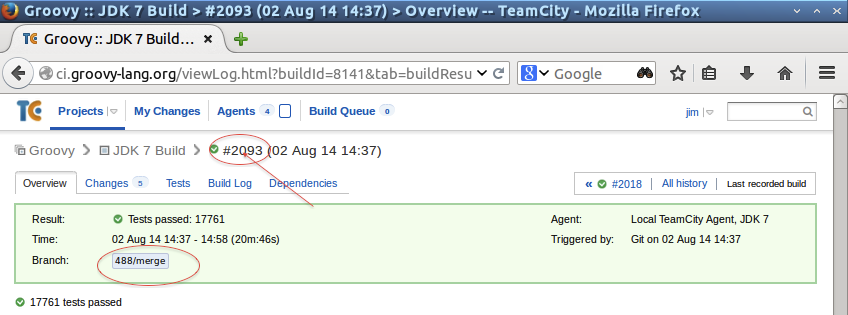
Ok, so here is the good news ! Request was successful. It passed all 17,761 tests.
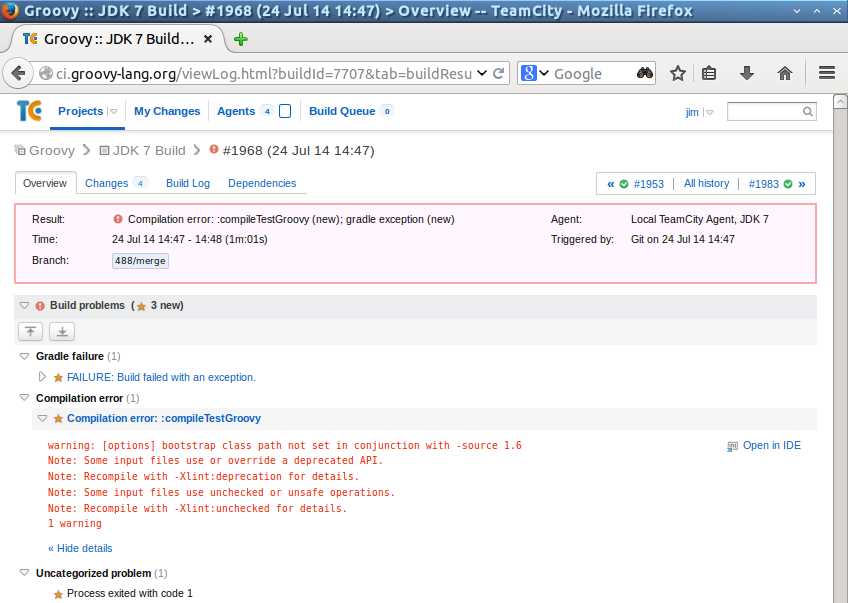
Oops There was an error !
As seen above in the task execution list, task 1968 had bad news. Clicking 1968 displays this view.
This needed some work on the part of the submitter to remedy the failure. The ![]() continuous integration server then scheduled and re-executed the revised submission.
continuous integration server then scheduled and re-executed the revised submission.


